mysql 乐观锁和悲观锁的具体使用

悲观锁介绍(百科):
悲观锁,正如其名,它指的是对数据被外界(包括本系统当前的其他事务,以及来自外部系统的事务处理)修改持保守态度,因此,在整个数据处理过程中, 将数据处于锁定状态。悲观锁的实现,往往依靠数据库提供的锁机制(也只有数据库层提供的锁机制才能真正保证数据访问的排他性,否则,即使在本系统中实现了 加锁机制,也无法保证外部系统不会修改数据)。
使用场景举例:以MySQL InnoDB为例
商品goods表中有一个字段status,status为1代表商品未被下单,status为2代表商品已经被下单,那么我们对某个商品下单时必须确保该商品status为1。假设商品的id为1。
1如果不采用锁,那么操作方法如下:
?| 1 2 3 4 5 6 | //1.查询出商品信息 select status from t_goods where id=1; //2.根据商品信息生成订单 insert into t_orders (id,goods_id) values ( null ,1); //3.修改商品status为2 update t_goods set status=2; |
上面这种场景在高并发访问的情况下很可能会出现问题。
前面已经提到,只有当goods status为1时才能对该商品下单,上面第一步操作中,查询出来的商品status为1。但是当我们执行第三步Update操作的时候,有可能出现其他 人先一步对商品下单把goods status修改为2了,但是我们并不知道数据已经被修改了,这样就可能造成同一个商品被下单2次,使得数据不一致。所以说这种方式是不安全的。
2使用悲观锁来实现:
在上面的场景中,商品信息从查询出来到修改,中间有一个处理订单的过程,使用悲观锁的原理就是,当我们在查询出goods信息后就把当前的数据锁定,直到我们修改完毕后再解锁。那么在这个过程中,因为goods被锁定了,就不会出现有第三者来对其进行修改了。
注:要使用悲观锁,我们必须关闭mysql数据库的自动提交属性,因为MySQL默认使用autocommit模式,也就是说,当你执行一个更新操作后,MySQL会立刻将结果进行提交。
我们可以使用命令设置MySQL为非autocommit模式:
?| 1 | set autocommit=0; |
设置完autocommit后,我们就可以执行我们的正常业务了。具体如下:
?| 1 2 3 4 5 6 7 8 9 10 11 | //0.开始事务 begin ;/ begin work ;/start transaction ; (三者选一就可以) //1.查询出商品信息 select status from t_goods where id=1 for update ; //2.根据商品信息生成订单 insert into t_orders (id,goods_id) values ( null ,1); //3.修改商品status为2 update t_goods set status=2; //4.提交事务 commit ;/ commit work ; |
注:上面的begin/commit为事务的开始和结束,因为在前一步我们关闭了mysql的autocommit,所以需要手动控制事务的提交,在这里就不细表了。
上面的第一步我们执行了一次查询操作:select status from t_goods where id=1 for update;
与普通查询不一样的是,我们使用了select…for update的方式,这样就通过数据库实现了悲观锁。此时在t_goods表中,id为1的 那条数据就被我们锁定了,其它的事务必须等本次事务提交之后才能执行。这样我们可以保证当前的数据不会被其它事务修改。
注:需要注意的是,在事务中,只有SELECT ... FOR UPDATE 或LOCK IN SHARE MODE 同一笔数据时会等待其它事务结束后才执行,一般SELECT ... 则不受此影响。拿 上面的实例来说,当我执行select status from t_goods where id=1 for update;后。我在另外的事务中如果再次执行select status from t_goods where id=1 for update;则第二个事务会一直等待第一个事务的提交,此时第二个查询处于阻塞的状态,但是如果我是在第二个事务中执行select status from t_goods where id=1;则能正常查询出数据,不会受第一个事务的影响。
补充:MySQL select…for update的Row Lock与Table Lock
上面我们提到,使用select…for update会把数据给锁住,不过我们需要注意一些锁的级别,MySQL InnoDB默认Row-Level Lock,所以只有「明确」地指定主键,MySQL 才会执行Row lock (只锁住被选取的数据) ,否则MySQL 将会执行Table Lock (将整个数据表单给锁住)。
举例说明:
数据库表t_goods,包括id,status,name三个字段,id为主键,数据库中记录如下;
?| 1 2 3 4 5 6 7 8 9 10 | mysql> select * from t_goods; + ----+--------+------+ | id | status | name | + ----+--------+------+ | 1 | 1 | 道具 | | 2 | 1 | 装备 | + ----+--------+------+ 2 rows in set mysql> |
注:为了测试数据库锁,我使用两个console来模拟不同的事务操作,分别用console1、console2来表示。
例1: (明确指定主键,并且有此数据,row lock)
console1:查询出结果,但是把该条数据锁定了
?| 1 2 3 4 5 6 7 8 9 | mysql> select * from t_goods where id=1 for update ; + ----+--------+------+ | id | status | name | + ----+--------+------+ | 1 | 1 | 道具 | + ----+--------+------+ 1 row in set mysql> |
console2:查询被阻塞
?| 1 | mysql> select * from t_goods where id=1 for update ; |
console2:如果console1长时间未提交,则会报错
mysql> select * from t_goods where id=1 for update;
ERROR 1205 : Lock wait timeout exceeded; try restarting transaction
例2: (明确指定主键,若查无此数据,无lock)
console1:查询结果为空
?| 1 2 | mysql> select * from t_goods where id=3 for update ; Empty set |
console2:查询结果为空,查询无阻塞,说明console1没有对数据执行锁定
?| 1 2 | mysql> select * from t_goods where id=3 for update ; Empty set |
例3: (无主键,table lock)
console1:查询name=道具 的数据,查询正常
?| 1 2 3 4 5 6 7 8 9 | mysql> select * from t_goods where name = '道具' for update ; + ----+--------+------+ | id | status | name | + ----+--------+------+ | 1 | 1 | 道具 | + ----+--------+------+ 1 row in set mysql> |
console2:查询name=装备 的数据,查询阻塞,说明console1把表给锁住了
?| 1 | mysql> select * from t_goods where name = '装备' for update ; |
console2:若console1长时间未提交,则查询返回为空
?| 1 2 | mysql> select * from t_goods where name = '装备' for update ; Query OK, -1 rows affected |
例4: (主键不明确,table lock)
console1:查询正常
?| 1 2 3 4 5 6 7 8 9 10 11 12 13 | mysql> begin ; Query OK, 0 rows affected mysql> select * from t_goods where id>0 for update ; + ----+--------+------+ | id | status | name | + ----+--------+------+ | 1 | 1 | 道具 | | 2 | 1 | 装备 | + ----+--------+------+ 2 rows in set mysql> |
console2:查询被阻塞,说明console1把表给锁住了
?| 1 | mysql> select * from t_goods where id>1 for update ; |
例5: (主键不明确,table lock)
console1:
?| 1 2 3 4 5 6 7 8 9 10 11 12 | mysql> begin ; Query OK, 0 rows affected mysql> select * from t_goods where id<>1 for update ; + ----+--------+------+ | id | status | name | + ----+--------+------+ | 2 | 1 | 装备 | + ----+--------+------+ 1 row in set mysql> |
console2:查询被阻塞,说明console1把表给锁住了
?| 1 | mysql> select * from t_goods where id<>2 for update ; |
console1:提交事务
?| 1 2 | mysql> commit ; Query OK, 0 rows affected |
console2:console1事务提交后,console2查询结果正常
?| 1 2 3 4 5 6 7 8 9 | mysql> select * from t_goods where id<>2 for update ; + ----+--------+------+ | id | status | name | + ----+--------+------+ | 1 | 1 | 道具 | + ----+--------+------+ 1 row in set mysql> |
以上就是关于数据库主键对MySQL锁级别的影响实例,需要注意的是,除了主键外,使用索引也会影响数据库的锁定级别
举例:
我们修改t_goods表,给status字段创建一个索引
修改id为2的数据的status为2,此时表中数据为:
?| 1 2 3 4 5 6 7 8 9 10 | mysql> select * from t_goods; + ----+--------+------+ | id | status | name | + ----+--------+------+ | 1 | 1 | 道具 | | 2 | 2 | 装备 | + ----+--------+------+ 2 rows in set mysql> |
例6: (明确指定索引,并且有此数据,row lock)
console1:
?| 1 2 3 4 5 6 7 8 9 | mysql> select * from t_goods where status=1 for update ; + ----+--------+------+ | id | status | name | + ----+--------+------+ | 1 | 1 | 道具 | + ----+--------+------+ 1 row in set mysql> |
console2:查询status=1的数据时阻塞,超时后返回为空,说明数据被console1锁定了
?| 1 2 | mysql> select * from t_goods where status=1 for update ; Query OK, -1 rows affected |
console2:查询status=2的数据,能正常查询,说明console1只锁住了行,未锁表
?| 1 2 3 4 5 6 7 8 9 | mysql> select * from t_goods where status=2 for update ; + ----+--------+------+ | id | status | name | + ----+--------+------+ | 2 | 2 | 装备 | + ----+--------+------+ 1 row in set mysql> |
例7: (明确指定索引,若查无此数据,无lock)
console1:查询status=3的数据,返回空数据
?| 1 2 | mysql> select * from t_goods where status=3 for update ; Empty set |
console2:查询status=3的数据,返回空数据
?| 1 2 | mysql> select * from t_goods where status=3 for update ; Empty set |
乐观锁介绍:
乐观锁( Optimistic Locking ) 相对悲观锁而言,乐观锁假设认为数据一般情况下不会造成冲突,所以在数据进行提交更新的时候,才会正式对数据的冲突与否进行检测,如果发现冲突了,则让返回用户错误的信息,让用户决定如何去做。那么我们如何实现乐观锁呢,一般来说有以下2种方式:
1.使用数据版本(Version)记录机制实现,这是乐观锁最常用的一种实现 方式。何谓数据版本?即为数据增加一个版本标识,一般是通过为数据库表增加一个数字类型的 “version” 字段来实现。当读取数据时,将version字段的值一同读出,数据每更新一次,对此version值加一。当我们提交更新的时候,判断数据库表对应记录 的当前版本信息与第一次取出来的version值进行比对,如果数据库表当前版本号与第一次取出来的version值相等,则予以更新,否则认为是过期数 据。用下面的一张图来说明:
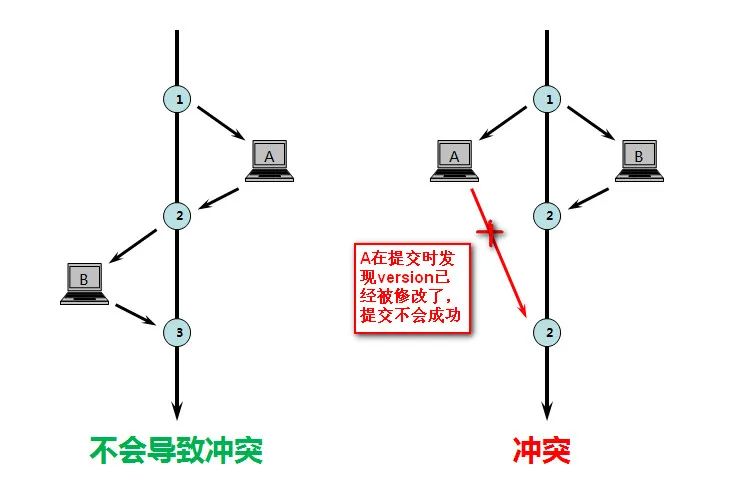
如上图所示,如果更新操作顺序执行,则数据的版本(version)依次递增,不会产生冲突。但是如果发生有不同的业务操作对同一版本的数据进行修 改,那么,先提交的操作(图中B)会把数据version更新为2,当A在B之后提交更新时发现数据的version已经被修改了,那么A的更新操作会失 败。
2.乐观锁定的第二种实现方式和第一种差不多,同样是在需要乐观锁控制的table中增加一个字段,名称无所谓,字段类型使用时间戳 (timestamp), 和上面的version类似,也是在更新提交的时候检查当前数据库中数据的时间戳和自己更新前取到的时间戳进行对比,如果一致则OK,否则就是版本冲突。
使用举例:以MySQL InnoDB为例
还是拿之前的实例来举:商品goods表中有一个字段status,status为1代表商品未被下单,status为2代表商品已经被下单,那么我们对某个商品下单时必须确保该商品status为1。假设商品的id为1。
下单操作包括3步骤:
1.查询出商品信息
?| 1 | select (status,status,version) from t_goods where id=#{id} |
2.根据商品信息生成订单
3.修改商品status为2
?| 1 2 3 | update t_goods set status=2,version=version+1 where id=#{id} and version=#{version}; |
那么为了使用乐观锁,我们首先修改t_goods表,增加一个version字段,数据默认version值为1。
t_goods表初始数据如下:
?| 1 2 3 4 5 6 7 8 9 10 | mysql> select * from t_goods; + ----+--------+------+---------+ | id | status | name | version | + ----+--------+------+---------+ | 1 | 1 | 道具 | 1 | | 2 | 2 | 装备 | 2 | + ----+--------+------+---------+ 2 rows in set mysql> |
对于乐观锁的实现,我使用MyBatis来进行实践,具体如下:
Goods实体类:
?| 1 2 3 4 5 6 7 8 9 10 11 12 13 14 15 16 17 18 19 20 21 22 23 24 25 26 27 28 29 30 31 32 33 34 35 36 37 38 39 40 41 | /** * ClassName: Goods <br/> * Function: 商品实体. <br/> * date: 2013-5-8 上午09:16:19 <br/> * @author chenzhou1025@126.com */ public class Goods implements Serializable { /** * serialVersionUID:序列化ID. */ private static final long serialVersionUID = 6803791908148880587L; /** * id:主键id. */ private int id; /** * status:商品状态:1未下单、2已下单. */ private int status; /** * name:商品名称. */ private String name; /** * version:商品数据版本号. */ private int version; @Override public String toString(){ return "good id:" +id+ ",goods status:" +status+ ",goods name:" +name+ ",goods version:" +version; } //setter and getter } |
GoodsDao
mapper.xml
?| 1 2 3 4 5 6 7 | < update id = "updateGoodsUseCAS" parameterType = "Goods" > <![CDATA[ update t_goods set status=#{status},name=#{name},version=version+1 where id=#{id} and version=#{version} ]]> </ update > |
GoodsDaoTest测试类
?| 1 2 3 4 5 6 7 8 9 10 11 12 13 14 15 16 17 18 19 20 21 | @Test public void goodsDaoTest(){ int goodsId = 1 ; //根据相同的id查询出商品信息,赋给2个对象 Goods goods1 = this .goodsDao.getGoodsById(goodsId); Goods goods2 = this .goodsDao.getGoodsById(goodsId); //打印当前商品信息 System.out.println(goods1); System.out.println(goods2); //更新商品信息1 goods1.setStatus( 2 ); //修改status为2 int updateResult1 = this .goodsDao.updateGoodsUseCAS(goods1); System.out.println( "修改商品信息1" +(updateResult1== 1 ? "成功" : "失败" )); //更新商品信息2 goods1.setStatus( 2 ); //修改status为2 int updateResult2 = this .goodsDao.updateGoodsUseCAS(goods1); System.out.println( "修改商品信息2" +(updateResult2== 1 ? "成功" : "失败" )); } |
输出结果:
good id:1,goods status:1,goods name:道具,goods version:1
good id:1,goods status:1,goods name:道具,goods version:1
修改商品信息1成功
修改商品信息2失败
说明:
在GoodsDaoTest测试方法中,我们同时查出同一个版本的数据,赋给不同的goods对象,然后先修改good1对象然后执行更新操作,执行成功。然后我们修改goods2,执行更新操作时提示操作失败。此时t_goods表中数据如下:
?| 1 2 3 4 5 6 7 8 9 10 | mysql> select * from t_goods; + ----+--------+------+---------+ | id | status | name | version | + ----+--------+------+---------+ | 1 | 2 | 道具 | 2 | | 2 | 2 | 装备 | 2 | + ----+--------+------+---------+ 2 rows in set mysql> |
我们可以看到 id为1的数据version已经在第一次更新时修改为2了。所以我们更新good2时update where条件已经不匹配了,所以更新不会成功,具体sql如下:
?| 1 2 3 | update t_goods set status=2,version=version+1 where id=#{id} and version=#{version}; |
这样我们就实现了乐观锁
到此这篇关于mysql 乐观锁和悲观锁的具体使用的文章就介绍到这了,更多相关mysql 乐观锁和悲观锁内容请搜索服务器之家以前的文章或继续浏览下面的相关文章希望大家以后多多支持服务器之家!
原文链接:https://blog.csdn.net/z_ssyy/article/details/128565101
1.本站遵循行业规范,任何转载的稿件都会明确标注作者和来源;2.本站的原创文章,请转载时务必注明文章作者和来源,不尊重原创的行为我们将追究责任;3.作者投稿可能会经我们编辑修改或补充。