Linux7.6二进制安装Mysql8.0.27详细操作步骤
吾爱主题
阅读:240
2024-04-02 18:53:01
评论:0

目录
- 一、环境准备
- 1.1 操作系统版本
- 1.2 磁盘空间
- 1.3 关闭防火墙
- 1.4 关闭 selinux
- 1.5 host解析
- 1.6 mysql下载
- 二、 yum安装及配置
- 2.1 挂载本地光盘镜像
- 2.2 配置yum源
- 2.3 安装依赖包
- 三、卸载mariadb
- 四、安装 mysql
- 4.1 用户及目录创建
- 4.2 用户及组
- 4.3 上传软件包并解压
- 五.环境变量配置
- 六.创建参数文件
- 七.数据库初始化
- 八.启动mysql
- 九.登陆mysql
- 十.修改密码
- 十一.远程登陆设置
一、环境准备
1.1 操作系统版本
?| 1 2 | [root@rhel76 ~]# cat /etc/redhat-release red hat enterprise linux server release 7.6 (maipo) |
1.2 磁盘空间
?| 1 2 3 4 5 6 7 8 9 10 11 | [root@rhel76 ~]# df -th filesystem type size used avail use% mounted on /dev/mapper/rhel-root xfs 32g 4.6g 27g 15% / devtmpfs devtmpfs 2.1g 0 2.1g 0% /dev tmpfs tmpfs 2.1g 0 2.1g 0% /dev/shm tmpfs tmpfs 2.1g 14m 2.1g 1% /run tmpfs tmpfs 2.1g 0 2.1g 0% /sys/fs/cgroup /dev/sda1 xfs 996m 172m 825m 18% /boot /dev/mapper/rhel-u01 xfs 30g 34m 30g 1% /u01 tmpfs tmpfs 413m 4.1k 413m 1% /run/ user /42 tmpfs tmpfs 413m 46k 413m 1% /run/ user /0 |
1.3 关闭防火墙
?| 1 2 3 4 5 6 7 8 9 10 11 12 13 14 15 16 17 18 | [root@rhel76 ~]# systemctl status firewalld ● firewalld.service - firewalld - dynamic firewall daemon loaded: loaded (/usr/lib/systemd/system/firewalld.service; enabled; vendor preset: enabled) active: active (running) since tue 2021-11-23 23:46:04 utc; 9min ago docs: man:firewalld(1) main pid: 9621 (firewalld) tasks: 2 cgroup: /system.slice/firewalld.service └─9621 /usr/bin/python -es /usr/sbin/firewalld --nofork --nopid nov 23 23:46:03 rhel76 systemd[1]: starting firewalld - dynamic firewall daemon... nov 23 23:46:04 rhel76 systemd[1]: started firewalld - dynamic firewall daemon. [root@rhel76 ~]# systemctl stop firewalld [root@rhel76 ~]# systemctl disable firewalld removed symlink /etc/systemd/system/multi- user .target.wants/firewalld.service. removed symlink /etc/systemd/system/dbus-org.fedoraproject.firewalld1.service. |

1.4 关闭 selinux
?| 1 2 3 4 5 6 7 8 9 10 11 12 13 | [root@rhel76 ~]# getenforce enforcing [root@rhel76 ~]# cp /etc/selinux/config /etc/selinux/config_` date + "%y%m%d_%h%m%s" ` [root@rhel76 ~]# sed -i 's/selinux\=enforcing/selinux\=disabled/g' /etc/selinux/config 以上修改完后重启 [root@rhel76 ~]# reboot [root@rhel76 ~]# getenforce disabled [root@rhel76 ~]# sestatus selinux status: disabled |
1.5 host解析
?| 1 2 3 4 5 6 7 8 | [root@rhel76 ~]# cat /etc/hosts 127.0.0.1 localhost localhost.localdomain localhost4 localhost4.localdomain4 ::1 localhost localhost.localdomain localhost6 localhost6.localdomain6 192.168.6.81 rhel76 [root@rhel76 ~]# hostname rhel76 |

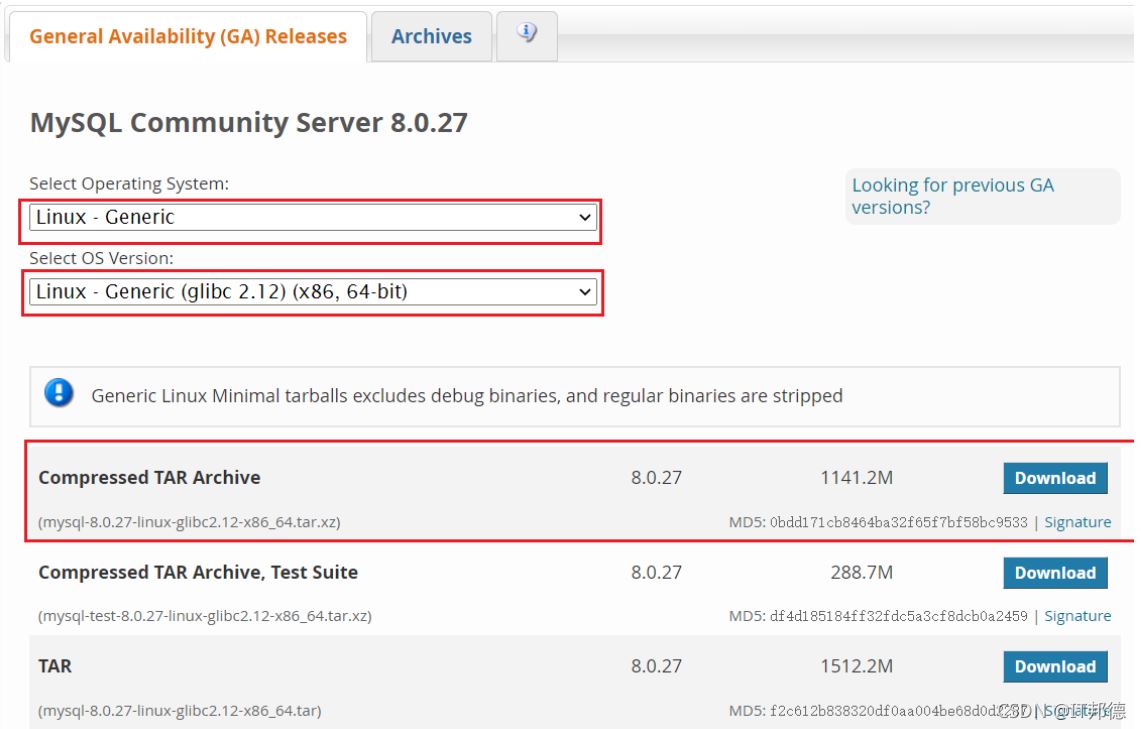
1.6 mysql下载
?| 1 2 | https://dev.mysql.com/downloads/mysql/ md5: 0bdd171cb8464ba32f65f7bf58bc9533 |
二、 yum安装及配置
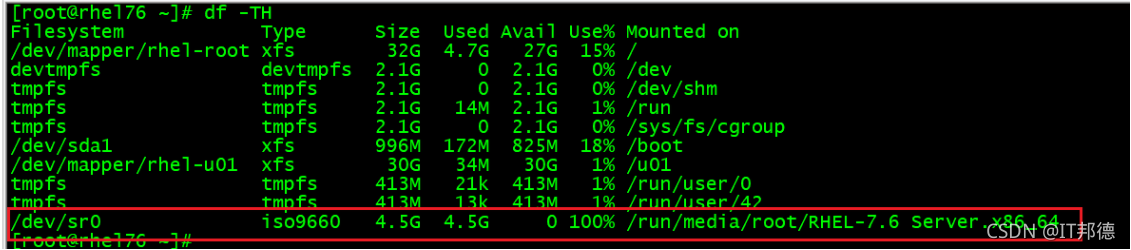
2.1 挂载本地光盘镜像
?| 1 2 3 4 5 6 7 8 9 10 11 12 13 14 15 16 17 18 | [root@rhel76 ~]# mkdir -p /mnt/dvd/ [root@rhel76 ~]# df -th filesystem type size used avail use% mounted on /dev/mapper/rhel-root xfs 32g 4.7g 27g 15% / devtmpfs devtmpfs 2.1g 0 2.1g 0% /dev tmpfs tmpfs 2.1g 0 2.1g 0% /dev/shm tmpfs tmpfs 2.1g 14m 2.1g 1% /run tmpfs tmpfs 2.1g 0 2.1g 0% /sys/fs/cgroup /dev/sda1 xfs 996m 172m 825m 18% /boot /dev/mapper/rhel-u01 xfs 30g 34m 30g 1% /u01 tmpfs tmpfs 413m 21k 413m 1% /run/ user /0 tmpfs tmpfs 413m 13k 413m 1% /run/ user /42 /dev/sr0 iso9660 4.5g 4.5g 0 100% /run/media/root/rhel-7.6 server.x86_64 [root@rhel76 ~]# mount /dev/sr0 /mnt/dvd mount: /dev/sr0 is write-protected, mounting read - only you have mail in /var/spool/mail/root |
2.2 配置yum源
?| 1 2 3 4 5 6 7 | [root@rhel76 ~]# cd /etc/yum.repos.d/ [root@rhel76 yum.repos.d]# cat >> /etc/yum.repos.d/redhat.repo << "eof" > [rhel7] > name =jeames repo > baseurl=file:///mnt/dvd/ > gpgcheck=0 > eof |
2.3 安装依赖包
?| 1 2 3 4 5 6 7 8 9 10 11 | [root@rhel76 ~]# yum -y groupinstall "development tools" loaded plugins: fastestmirror, product-id, search-disabled-repos, subscription-manager this system is not registered with an entitlement server. you can use subscription-manager to register. there is no installed groups file. maybe run: yum groups mark convert (see man yum) loading mirror speeds from cached hostfile warning: group development does not have any packages to install. maybe run: yum groups mark install (see man yum) no packages in any requested group available to install or update [root@rhel76 ~]# yum -y install ncurses ncurses-devel openssl-devel bison gcc gcc-c++ make |

三、卸载mariadb
?| 1 2 3 4 | [root@rhel76 ~]# rpm -qa |grep mariadb mariadb-libs-5.5.60-1.el7_5.x86_64 [root@rhel76 ~]# rpm -e --nodeps mariadb-libs-5.5.60-1.el7_5.x86_64 |
四、安装 mysql
4.1 用户及目录创建
?| 1 | 注:可以部署多个实例,通过端口区分root 用户操作:mkdir -p /mysql/data/mysql3306mkdir -p /mysql/app/mkdir -p /mysql/conf/mkdir -p /mysql/data/mysql3306/pid/mkdir -p /mysql/data/mysql3306/socket/mkdir -p /mysql/data/mysql3306/log/mkdir -p /mysql/data/mysql3306/binlog/mkdir -p /mysql/data/mysql3306/errlogmkdir -p /mysql/data/mysql3306/relaylog/mkdir -p /mysql/data/mysql3306/slowlog/mkdir -p /mysql/data/mysql3306/tmp/ |
4.2 用户及组
?| 1 2 3 4 5 6 7 8 9 10 11 12 13 14 | [root@rhel76 ~]# groupadd mysql [root@rhel76 ~]# useradd -g mysql mysql [root@rhel76 ~]# chown -r mysql:mysql /mysql [root@rhel76 ~]# passwd mysql changing password for user mysql. new password : bad password : the password is shorter than 8 characters retype new password : passwd: all authentication tokens updated successfully. [root@rhel76 ~]# cat /etc/ group | grep mysql mysql:x:1001: [root@rhel76 ~]# cat /etc/passwd | grep mysql mysql:x:1001:1001::/home/mysql:/bin/bash |

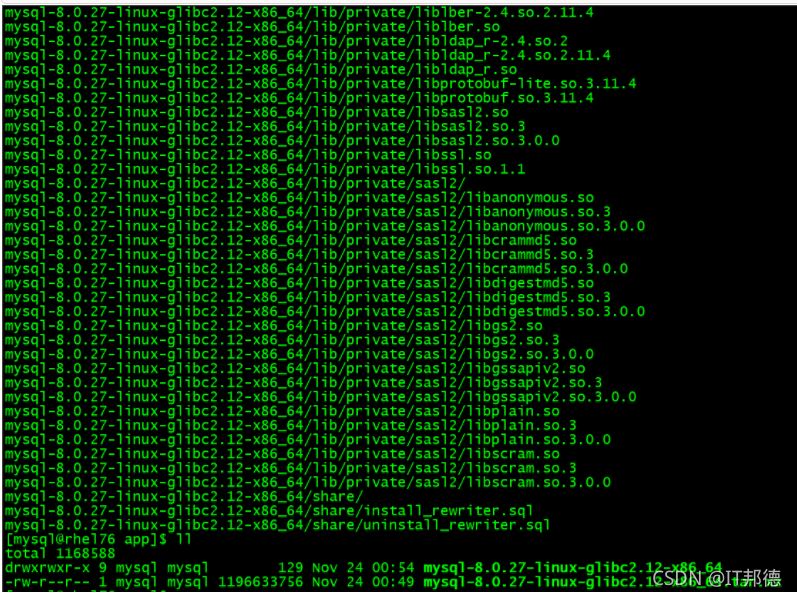
4.3 上传软件包并解压
?| 1 2 3 4 5 6 7 8 9 10 11 12 13 14 15 16 17 18 19 20 21 | [root@rhel76 ~]# cp mysql-8.0.27-linux-glibc2.12-x86_64.tar.xz /mysql/app [root@rhel76 ~]# chown -r mysql:mysql /mysql mysql用户操作 [root@rhel76 ~]# su - mysql md5 值验证,保证下载到的软件包无破损无木马 [mysql@rhel76 ~]$ cd /mysql/app [mysql@rhel76 app]$ ll total 1168588 -rw-r --r-- 1 mysql mysql 1196633756 nov 24 00:49 mysql-8.0.27-linux-glibc2.12-x86_64.tar.xz [mysql@rhel76 app]$ md5sum mysql-8.0.27-linux-glibc2.12-x86_64.tar.xz 0bdd171cb8464ba32f65f7bf58bc9533 mysql-8.0.27-linux-glibc2.12-x86_64.tar.xz 解压软件包并重命名 [mysql@rhel76 app]$ tar xvf mysql-8.0.27-linux-glibc2.12-x86_64.tar.xz [mysql@rhel76 app]$ mv mysql-8.0.27-linux-glibc2.12-x86_64 mysql8.0.27 [mysql@rhel76 app]$ ll total 1168588 drwxrwxr-x 9 mysql mysql 129 nov 24 00:54 mysql8.0.27 -rw-r --r-- 1 mysql mysql 1196633756 nov 24 00:49 mysql-8.0.27-linux-glibc2.12-x86_64.tar.xz |
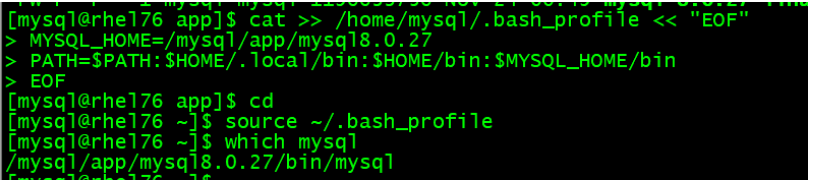
五.环境变量配置
?| 1 2 3 4 5 6 7 8 | cat >> /home/mysql/.bash_profile << "eof" mysql_home=/mysql/app/mysql8.0.27 path=$path:$home/. local /bin:$home/bin:$mysql_home/bin eof source ~/.bash_profile which mysql |
六.创建参数文件
?| 1 2 3 4 5 6 7 8 9 10 11 12 13 14 15 16 17 18 19 20 21 22 23 24 25 26 27 28 29 30 31 32 33 34 35 36 37 38 39 40 41 42 | 由于是二进制文件安装,数据库参数文件需要自己配置 cat >> /mysql/conf/my3306.cnf << "eof" [mysqld] server_id = 80273306 default -storage-engine= innodb basedir=/mysql/app/mysql8.0.27 datadir=/mysql/data/mysql3306/data/ socket=/mysql/data/mysql3306/socket/mysql.sock log-error=/mysql/data/mysql3306/log/mysqld.log pid-file=/mysql/data/mysql3306/pid/mysqld.pid port=3306 default -time_zone= '+8:00' default_authentication_plugin=mysql_native_password # 加此参数可远程登陆 transaction_isolation= read - committed max_connections=1500 back_log=500 wait_timeout=1800 max_user_connections=800 innodb_buffer_pool_size=1024m innodb_log_file_size=512m innodb_log_buffer_size=40m slow_query_log= on long_query_time=5 # log settings # slow_query_log = on slow_query_log_file = /mysql/data/mysql3306/slowlog/slow3306.log log_error = /mysql/data/mysql3306/errlog/err3306.log log_error_verbosity = 3 log_bin = /mysql/data/mysql3306/binlog/mysql_bin log_bin_index = /mysql/data/mysql3306/binlog/mysql_binlog. index general_log_file = /data/mysql/mysql3306/generallog/general.log log_queries_not_using_indexes = 1 log_slow_admin_statements = 1 expire_logs_days = 90 binlog_expire_logs_seconds = 2592000 #30d long_query_time = 2 min_examined_row_limit = 100 log_throttle_queries_not_using_indexes = 1000 innodb_flush_log_at_trx_commit=1 eof |
七.数据库初始化
?| 1 2 3 | mysql用户操作: mysqld --defaults-file=/mysql/conf/my3306.cnf --initialize --user=mysql --basedir=/mysql/app/mysql8.0.27 --datadir=/mysql/data/mysql3306/data/ 注意:以上同一行执行 |
八.启动mysql
?| 1 2 3 4 | [mysql@rhel76 ~]$ mysqld_safe --defaults-file=/mysql/conf/my3306.cnf --user=mysql & [1] 21406 [mysql@rhel76 ~]$ 2021-11-24t06:14:23.240372z mysqld_safe logging to '/mysql/data/mysql3306/errlog/err3306.log' . 2021-11-24t06:14:23.296992z mysqld_safe starting mysqld daemon with databases from /mysql/data/mysql3306/data |

九.登陆mysql
?| 1 2 3 4 5 6 7 8 9 10 11 12 13 14 15 16 17 18 19 20 21 22 23 24 25 26 27 28 29 30 31 32 33 34 35 36 | 第一次登录 mysql 时,需要到错误日志下找初始化密码,我这里的密码为:-(qy5aj9t,=a 使用 socket 加密码登录进去后,无法查询任何东西,提示先要修改 root 密码。 [mysql@rhel76 ~]$ cat /mysql/data/mysql3306/errlog/err3306.log | grep password 2021-11-24t06:12:14.610657z 0 [note] [my-010309] [server] auto generated rsa key files through --sha256_password_auto_generate_rsa_keys are placed in data directory. 2021-11-24t06:12:14.610686z 0 [note] [my-010308] [server] skipping generation of rsa key pair through --caching_sha2_password_auto_generate_rsa_keys as key files are present in data directory. 2021-11-24t06:12:14.615367z 6 [note] [my-010454] [server] a temporary password is generated for root@localhost: -(qy5aj9t,=a 2021-11-24t06:14:26.153958z 0 [note] [my-010308] [server] skipping generation of rsa key pair through --sha256_password_auto_generate_rsa_keys as key files are present in data directory. 2021-11-24t06:14:26.153979z 0 [note] [my-010308] [server] skipping generation of rsa key pair through --caching_sha2_password_auto_generate_rsa_keys as key files are present in data directory. [mysql@rhel76 ~]$ mysql -uroot -p enter password : error 2002 (hy000): can 't connect to local mysql server through socket ' /tmp/mysql.sock ' (2) ##此处通过sock登陆 [mysql@rhel76 ~]$ mysql -uroot -p -p 3306 -s /mysql/data/mysql3306/socket/mysql.sock enter password: welcome to the mysql monitor. commands end with ; or \g. your mysql connection id is 8 server version: 8.0.27 copyright (c) 2000, 2021, oracle and/or its affiliates. oracle is a registered trademark of oracle corporation and/or its affiliates. other names may be trademarks of their respective owners. type ' help; ' or ' \h ' for help. type ' \c' to clear the current input statement. mysql> status error 1820 (hy000): you must reset your password using alter user statement before executing this statement. |
十.修改密码
?| 1 | mysql> alter user root@ 'localhost' identified by 'root' ;query ok, 0 rows affected (0.01 sec)mysql> status --------------mysql ver 8.0.27 for linux on x86_64 (mysql community server - gpl)connection id: 8current database:current user: root@localhostssl: not in usecurrent pager: stdoutusing outfile: ''using delimiter: ;server version: 8.0.27protocol version: 10connection: localhost via unix socketserver characterset: utf8mb4db characterset: utf8mb4client characterset: utf8mb4conn. characterset: utf8mb4unix socket: /mysql/data/mysql3306/socket/mysql.sockbinary data as: hexadecimaluptime: 8 min 0 secthreads: 2 questions: 7 slow queries: 0 opens: 398 flush tables: 3 open tables: 36 queries per second avg: 0.014-------------- |
十一.远程登陆设置
?| 1 2 3 4 5 6 7 8 9 10 11 12 13 14 15 16 17 18 19 20 | 使用如下语句创建 root 用户是无法通过 navicat 等客户端登录的, 由于从 mysql8 开始,身份验证插件发生改变, 默认的 “caching_sha2_password” 不允许远程登录, 故需将此插件修改为 “mysql_native_password” 便可登录。 mysql> create user root@ '%' identified with mysql_native_password by 'root' ; mysql> grant all on *.* to root@ '%' with grant option ; mysql> flush privileges ; mysql> select user ,host,plugin from mysql. user ; + ------------------+-----------+-----------------------+ | user | host | plugin | + ------------------+-----------+-----------------------+ | root | % | mysql_native_password | | mysql.infoschema | localhost | caching_sha2_password | | mysql.session | localhost | caching_sha2_password | | mysql.sys | localhost | caching_sha2_password | | root | localhost | mysql_native_password | + ------------------+-----------+-----------------------+ 5 rows in set (0.00 sec) |

到此这篇关于linux7.6二进制安装mysql8.0.27详细操作步骤的文章就介绍到这了,更多相关linux7.6二进制安装mysql8.0.27内容请搜索服务器之家以前的文章或继续浏览下面的相关文章希望大家以后多多支持服务器之家!
原文链接:https://blog.csdn.net/weixin_41645135/article/details/121526797
声明
1.本站遵循行业规范,任何转载的稿件都会明确标注作者和来源;2.本站的原创文章,请转载时务必注明文章作者和来源,不尊重原创的行为我们将追究责任;3.作者投稿可能会经我们编辑修改或补充。