Linux系统下为Nginx安装多版本PHP
我们在安装配置服务器LNPM环境时应该考虑到PHP多版本并存的问题,下面是实现Linux系统下为Nginx安装多版本PHP的实现方法
linux版本:64位CentOS 6.4
Nginx版本:nginx1.8.0
php版本:php5.5.28 & php5.4.44
注意假如php5.5是主版本已经安装在/usr/local/php目录下,那么再安装其他版本的php再指定不同安装目录即可。
安装PHP
?| 1 2 3 4 5 6 7 8 9 10 11 12 13 14 15 16 17 18 19 20 21 22 23 24 25 26 27 28 29 30 31 32 33 34 35 36 37 38 39 40 41 | # wget http://cn2.php.net/get/php-5.4.44.tar.gz/from/this/mirror # tar zxvf php-5.4.44.tar.gz # cd php-5.4.44 #./configure --prefix=/usr/local/php5.4.44 \ --with-curl \ --with-freetype- dir \ --with-gd \ --with-gettext \ --with-iconv- dir \ --with-kerberos \ --with-libdir=lib64 \ --with-libxml- dir \ --with-mysql \ --with-mysqli \ --with-openssl \ --with-pcre-regex \ --with-pdo-mysql \ --with-pdo-sqlite \ --with-pear \ --with-png- dir \ --with-xmlrpc \ --with-xsl \ --with-zlib \ -- enable -fpm \ -- enable -bcmath \ -- enable -libxml \ -- enable -inline-optimization \ -- enable -gd-native-ttf \ -- enable -mbregex \ -- enable -mbstring \ -- enable -pcntl \ -- enable -shmop \ -- enable -soap \ -- enable -sockets \ -- enable -sysvsem \ -- enable -xml \ -- enable -zip # make && make install # cp -R ./sapi/fpm/php-fpm.conf /usr/local/php5.4.44/etc/php-fpm.conf # cp php.ini-development /usr/local/php5.4.44/lib/php.ini # cp -R ./sapi/fpm/php-fpm /etc/init.d/php-fpm5.4.44 |
修改php-fpm.conf的侦听端口为9001,因为主版本5.5.28是侦听9000。
?| 1 2 | ; Note: This value is mandatory. listen = 127.0.0.1:9001 |
启动php-fpm
?| 1 | # /etc/init.d/php-fpm5.4.44 |
php安装成功查看进程
?| 1 | #ps aux|grep php |

这样就已经起好php-fpm了。
配置Nginx
增加一段新的端口8054的配置并指向到9001以及指定目录即可:
?| 1 2 3 4 5 6 7 8 9 10 11 12 13 14 15 16 17 18 19 20 21 22 23 24 25 26 27 | server { listen 8054; server_name localhost; location / { #root html; root /usr/www5 .4.44; index index.html index.htm; } error_page 500 502 503 504 /50x .html; location = /50x .html { root html; } location ~ \.php$ { root html; fastcgi_pass 127.0.0.1:9001; fastcgi_index index.php; include fastcgi_params; fastcgi_param SCRIPT_FILENAME /usr/www5 .4.44$fastcgi_script_name; } } |
nginx的配置文件nginx.conf在
?| 1 | # cd /usr/local/nginx/conf |
完整的nginx配置如下:
?| 1 2 3 4 5 6 7 8 9 10 11 12 13 14 15 16 17 18 19 20 21 22 23 24 25 26 27 28 29 30 31 32 33 34 35 36 37 38 39 40 41 42 43 44 45 46 47 48 49 50 51 52 53 54 55 56 57 58 59 60 61 62 63 64 65 66 67 68 69 70 71 72 73 74 75 76 77 78 79 80 81 82 83 84 85 86 87 88 89 90 91 92 93 94 95 96 97 98 99 100 101 102 103 104 105 106 107 108 109 110 111 112 113 114 115 116 117 118 119 120 121 122 123 124 125 126 127 128 129 130 131 132 133 134 135 136 137 138 139 140 141 142 143 144 145 146 147 148 149 150 151 | #user nobody; worker_processes 4; #error_log logs/error.log; #error_log logs/error.log notice; #error_log logs/error.log info; #pid logs/nginx.pid; events { worker_connections 1024; } http { include mime.types; default_type application /octet-stream ; #log_format main '$remote_addr - $remote_user [$time_local] "$request" ' # '$status $body_bytes_sent "$http_referer" ' # '"$http_user_agent" "$http_x_forwarded_for"'; #access_log logs/access.log main; sendfile on; #tcp_nopush on; #keepalive_timeout 0; keepalive_timeout 65; #gzip on; server { listen 80; server_name localhost; #charset koi8-r; #access_log logs/host.access.log main; location / { #root html; root /usr/www ; index index.html index.htm; } #error_page 404 /404.html; # redirect server error pages to the static page /50x.html # error_page 500 502 503 504 /50x .html; location = /50x .html { root html; } # proxy the PHP scripts to Apache listening on 127.0.0.1:80 # #location ~ \.php$ { # proxy_pass http://127.0.0.1; #} # pass the PHP scripts to FastCGI server listening on 127.0.0.1:9000 # #location ~ \.php$ { # root html; # fastcgi_pass 127.0.0.1:9000; # fastcgi_index index.php; # fastcgi_param SCRIPT_FILENAME /scripts$fastcgi_script_name; # include fastcgi_params; #} location ~ \.php$ { root html; fastcgi_pass 127.0.0.1:9000; fastcgi_index index.php; include fastcgi_params; fastcgi_param SCRIPT_FILENAME /usr/www $fastcgi_script_name; } # deny access to .htaccess files, if Apache's document root # concurs with nginx's one # #location ~ /\.ht { # deny all; #} } server { listen 8054; server_name localhost; location / { #root html; root /usr/www5 .4.44; index index.html index.htm; } error_page 500 502 503 504 /50x .html; location = /50x .html { root html; } location ~ \.php$ { root html; fastcgi_pass 127.0.0.1:9001; fastcgi_index index.php; include fastcgi_params; fastcgi_param SCRIPT_FILENAME /usr/www5 .4.44$fastcgi_script_name; } } # another virtual host using mix of IP-, name-, and port-based configuration # #server { # listen 8000; # listen somename:8080; # server_name somename alias another.alias; # location / { # root html; # index index.html index.htm; # } #} # HTTPS server # #server { # listen 443 ssl; # server_name localhost; # ssl_certificate cert.pem; # ssl_certificate_key cert.key; # ssl_session_cache shared:SSL:1m; # ssl_session_timeout 5m; # ssl_ciphers HIGH:!aNULL:!MD5; # ssl_prefer_server_ciphers on; # location / { # root html; # index index.html index.htm; # } #} } |
重启nginx
?| 1 | # /usr/local/nginx/sbin/nginx -s reload |
注意需要防火墙增加新端口的开启,不然无法访问:
防火墙配置
注意如果你希望在本地机器例如xp访问虚拟机的网页,如果是centos6需要修改防火墙启动80端口
?| 1 | # cd /etc/sysconfig |
修改iptables文件,或者直接用vim编辑
?| 1 | # vim /etc/sysconfig/iptables |
添加下面一行,打开防火墙80端口:
?| 1 | -A INPUT -m state --state NEW -m tcp -p tcp --dport 8054 -j ACCEPT |
重启防火墙
?| 1 | # /etc/init.d/iptables restart |
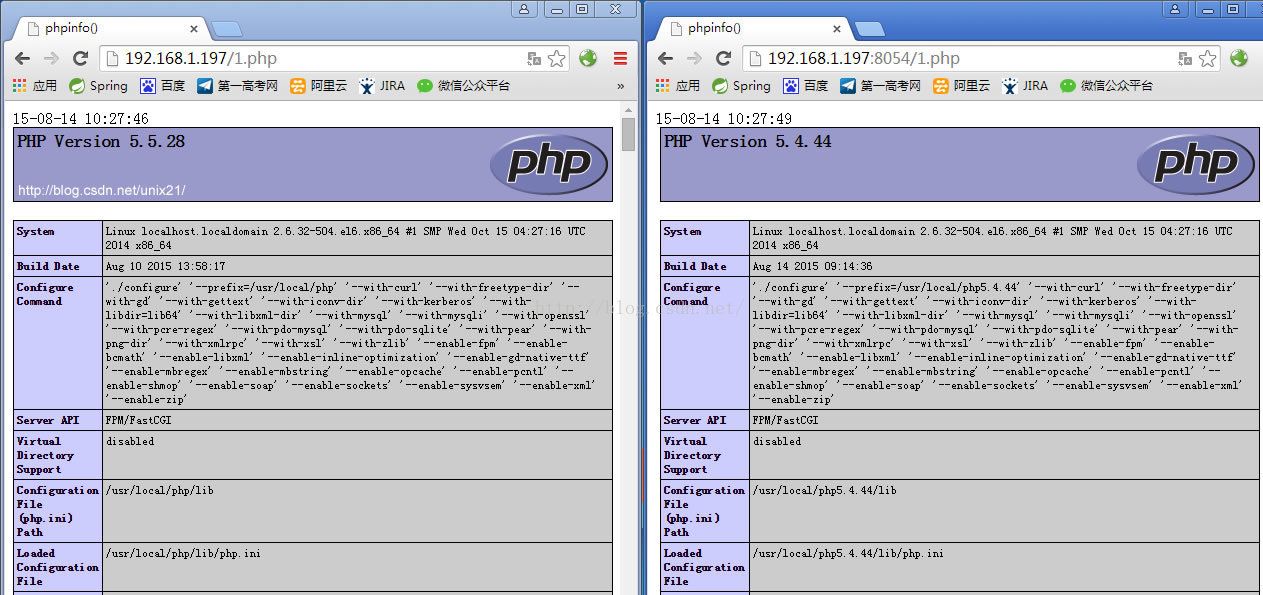
测试是否成功,查看phpinfo()

以上即是Linux系统下为Nginx安装多版本PHP的方法,希望对大家有用
原文链接:https://blog.csdn.net/21aspnet/article/details/47658127
1.本站遵循行业规范,任何转载的稿件都会明确标注作者和来源;2.本站的原创文章,请转载时务必注明文章作者和来源,不尊重原创的行为我们将追究责任;3.作者投稿可能会经我们编辑修改或补充。


